Mama Lane Cooks
Food from My Kitchen
Make Ahead Frozen Breakfast Burritos
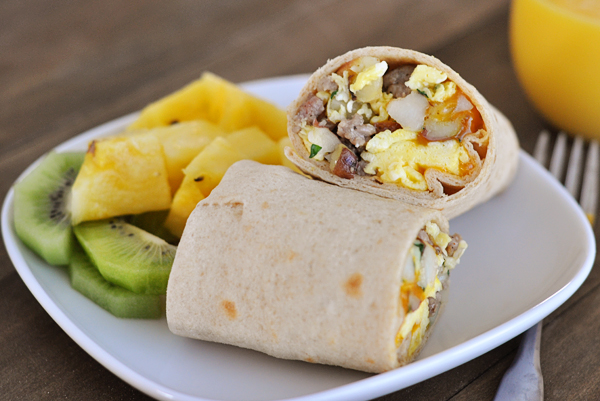
I don’t know about you, but our mornings are typically a little chaotic. I am not one of these “morning moms” that is up before the kids- dressed and ready to take on the world. I am more of the roll out of bed, I need my coffee before I can function kind of mom. That’s why I am always looking for ways to make my family’s mornings easy.
Make ahead breakfast meals is one way that get our mornings started off to a bright and happy start! These breakfast burritos can be stored in your fridge all week or frozen for up to a month. Add whatever your favorite add-ins are like tomatoes, salsa, mushrooms or bell peppers and feel good about serving your family up a helping of healthy food in under 2 minutes! They are also great for on-the-go breakfast meals, not that you’ll need it. But, if you happen to have to feed your littles ones breakfast in the car on the way to school, at least you’ll know they are getting a happy fill of protein, so they can feel good and focus on their school work. (And don’t feel bad…my kiddos have eaten many a meal on the go. Hello to motherhood, have to love this crazy, chaotic life!)
Make Ahead Frozen Breakfast Burritos
12 large eggs
2 T. cream
1 lb. pork sausage (optional)
Chopped Chives
1 tsp. hot sauce
Salt and pepper to taste
1 cup cooked, diced potatoes (make it easy and buy frozen diced hashbrowns)
1 tablespoon oil
1 cup shredded cheese (I like to use Terrell Creek Cherve or Edgewood Creamery White Cheddar- both from local farms)
20 6-inch tortillas
20 parchment paper squares or alumni foil, about 10 inches
*Other add-ins: tomato, mushrooms, bell peppers, spinach
In a bowl, whisk the eggs, cream, chives, hot sauce, salt and pepper. In a medium skillet (about 10 inches) over medium-high heat, heat olive oil and pour in whisked eggs. Once they start cooking, add in any add-ins you please. Continue to stir the egg and topping mixture until fully cooked/scrambled and remove to bowl.
In the same skillet you cooked the eggs, add the sausage over medium heat. Let the sausage brown properly by not stirring the sausage around in the skillet. (I like using my cast iron skillet for browning meat.) When the sausage has cooked for 5 minutes, add the potatoes and continue to cook for another 5 minutes.
Add the cooked sausage/potato mixture to the eggs and stir to combine.
On a flat surface, place a tortilla on top of a parchment paper square. Top the tortilla with about ¼ cup of the mixture, top with cheese and any other toppings or salsa.
Fold tortilla over the fillings, fold in the sides, and roll into a burrito. Once your breakfast burrito is closed, wrap with the parchment paper or alumni foil square.
Repeat the process with remaining tortillas and mixture. Once cooled, transfer assembled burritos into a gallon sized freezer bag and refrigerate for up to a week or freeze for up to one month.
To eat, simply warm directly in the microwave until heated through.
To freeze and reheat burritos: Wrap each burrito in waxed paper and foil. Freeze for up to 1 month. To use, remove foil and waxed paper. Place one burrito on a microwave-safe plate, cover with paper towel. Microwave on high for 2 minutes, turning burrito over once. Let stand for 20 seconds.
Freezer-Friendly Breakfast Sandwiches

It’s true. Most moms today fuel up on caffeine, chaos and probably a few choice cuss words in the morning as they rush to get their littles out the door for school. As a mom-on-the-go I am always looking for easy ways to feed my family healthy meals before school. Breakfast is the most important meal of the day and often times gets skipped (totally guilty of this) or substituted for cereal bars or sugary substitutes.
That’s why I love making breakfast sandwiches and taking the stress out of weekday breakfast.
There are two ways I make breakfast sandwiches. Either I make a large platter of scrabbled eggs that I cut out with biscuit cutters or I cook individual eggs “over well”. I also only use farm-raised eggs, as the yolks are rich and delicious and local bacon, as the bacon is thicker and much more tastier!
So, forget fueling up on caffeine, chaos and cuss words (well…maybe not the caffeine) and make your mornings a whole lot happier with a little bit of prep work once a week. Enjoy!

Make Ahead Freezer Breakfast Sandwiches (AKA: Mom’s McMuffins)
Makes 6 sandwiches
10 large farm-raised eggs
1 cup whole milk
½ tsp. pepper
1 teaspoon kosher salt
½ tsp. chives
6 slices farm-raised bacon, deli slices of ham or sausage patties
6 slices cheese, like cheddar, Monterey jack, or Swiss
6 whole wheat English muffins, bagels, toast or croissant rolls
Biscuit cutter
Preheat the oven to 375°F.
Make the eggs:
In a large bowl whisk the eggs together with the milk and seasonings. Grease a 9×13 baking pan and pour the eggs into the pan. Place on the lower rack in the oven. Bake until the eggs are puffed around the edges with golden spots, about 25 to 30 minutes. Cool completely.
Or, you can fry an egg (my preferred method). Warm a skillet and melt the butter: Place the pan over medium heat. Crack the egg into a measuring cup and gently tip it into the skillet. You can crack the egg directly into the skillet if you prefer. Let the egg cook for a few minutes: Let the egg gently cook without moving it. The whites will start to set after a few minutes, followed by the yolk. Next flip the egg over and cook for a minute on the other side and remove to plate.
Make the bacon:
Line a baking sheet with foil and place bacon slices on foil. Place the bacon on the upper rack in the oven and bake until the bacon is crispy, 15 to 20 minutes. Transfer the bacon to a plate lined with paper towels to drain and cool. Cut each piece in half.
Slice the cheese:
Slice 6 pieces of cheese, my favorite to use is a sharp cheddar, and lay on a plate.
Toast the English muffins:
When the eggs and the bacon are both finished, place the English muffins cut-side-up on a baking sheet and toast in the oven for just a few minutes, until the edges are toasted. If desired, you can brush the muffins with butter before toasting.
Cut out the egg rounds:
Use a spatula to lift the eggs out of the pan and onto a cutting board. Using a large biscuit cutter and cut 6 rounds out of the eggs. Use the egg scraps for more sandwiches or they can go in salads, stir-fries, or other quick meals during the week.
Assemble the sandwiches:
Lay the bottom halves of the English muffins in a row on your counter. Top each one with an egg round, a slice of cheese, and 2 pieces of bacon (if using). Finish by adding the muffin tops.
Wrap the sandwiches for freezing:
Wrap each sandwich in a square of aluminum foil. Use a permanent marker to write the contents and date on the sandwich. Put all the sandwiches in a freezer bag or container. Freeze for up to 1 month.
How to reheat frozen breakfast sandwiches
Unwrap the frozen sandwich and place on a microwave-safe plate lined with a paper towel. Heat at full power for 1 1/2 minutes (every microwave is different so you will have to see what works for you), or until the cheese is melted and the egg is warmed through.
Or take a little extra time and heat up in the oven. Preheat oven to 375 degree and place egg sandwich on a baking sheet and cook for 25 minutes.
Cinnamon Apple Muffins from the Market

Every Labor Day I get excited for Fall Fever! Falling leaves, football games, apple cider, boots, sweaters, crisp air, pumpkin patches, and fall produce at Farmers Market of the Ozarks – these are just a few of my favorite things about fall in the Ozarks.
This is a perfect time to head out to the farmers market and enjoy in the fall produce selection, including local apples! I picked up a few varieties today at the market to make Cinnamon Apple Muffins this week, a family favorite!
Get out to market this weekend and pick-up a bag of delicious local apples and a variety of other products from our local farmers. I highly suggest you check out Down to Earth Foods for all your dry pantry items like flour, cinnamon, vanilla and other items. This unique vendor provides a huge selection and you’ll be supporting a local business. PT Gardens also makes an Apple Pie Spice Mix that would be perfect for this recipe. Pick-up eggs and milk from the wonderful vendors at FMO as well.
Cinnamon Apple Muffins from the Market
2 cups all-purpose flour (plus 2 teaspoons for coating apples)
1½ teaspoons baking powder
½ teaspoon salt
2 teaspoons ground cinnamon (plus ½ teaspoon for coating apples)
2 cups diced local apples
½ cup (1 stick) unsalted butter, room temperature
1 cup granulated sugar
2 large farm eggs
2 teaspoons pure vanilla extract
½ cup Edgewood Creamery or Ozarks Mtn. Creamery milk
For the Topping:
½ cup butter, melted
¼ cup granulated sugar
¼ cup ground cinnamon
Preheat oven to 375º F. Spray muffin tins with bakers spray or coat well with shortening or butter and flour, making sure to discard any excess flour from the tins after coating.
Prepare topping for muffins while the muffins are baking by melting the butter and allowing to cool slightly. Pour butter into a separate bowl sized easy for dipping tops of muffins. Mix together granulated sugar and cinnamon in a separate bowl and set aside.
Sift together flour, baking powder, salt, and cinnamon in a medium bowl. Set aside. Toss together diced apples and 2 teaspoons of flour to coat apples in a separate bowl. Set aside.
Cream together butter and sugar until lightened in color, about 3 minutes. Add an egg, one at a time, taking care to fully incorporate before adding the other. Mix in vanilla.
Gently fold in flour mixture, alternating with milk. Stir until just combined. Fold in diced apples and scoop mixture into prepared muffin tins, filling about ⅔ to ¾ full. Bake until a toothpick or skewer inserted in the middle comes out clean, about 30 minutes.
Once muffins have baked, remove from the oven and allow to cool slightly in the muffin tin. Then, remove each muffin and dip first into the melted butter and then into the cinnamon sugar mixture. Place onto a plate to finish cooling.
Toddler Snacks Ideas
 I’m a big believer in involving my kids around the kitchen as much as possible to introduce healthy eating habits at an early age. I introduced my own littles to fun in the kitchen with pudding art when they were around 18 months old. Spreading out white paper on the table, tapping it down and having bowls of pudding that they could dip their fingers into and draw on the paper…and even eat! They LOVED this and I enjoyed watching their faces light up.
As the kids got older they helped with rolling cookies, washing veggies and setting our dinner table. Now, they help in making their own snacks, using the vegetable peeler and stirring mixtures. The older they get, the more responsibility they are given- and funny thing…they think it’s FUN to be in the kitchen. They enjoy eating new foods and being part of the action in the kitchen.
I enjoy sharing my own experiences with others and ways in which they can introduce good, healthy foods to their little ones. Putting on cooking demonstrations at our local farmers markets is something that I have done since 2011 and now I am able to share in those experiences with my kiddos.
Cora recently was my “sous chef” at a SNAP “Food Stamp” Day we held at Farmers Market of the Ozarks (FMO) where I work. Our market just launched a Double Up Food Stamp Program, which allows food stamp participants the ability to double their money on fruit and vegetables at our market. (See photos below.)
We explained to participants how to make homemade baby food using local products from FMO, how the Double Up Program worked and we prepared a variety of quick and easy side dishes for participants to sample.
Here are some of my kid’s favorite homemade snacks that we make at our house. Enjoy!
- Baked Sweet Potato Fries
- Tortilla Pizzas: Tortillas, market salsa, topped with market cheese
- Zucchini Muffins
- Graham crackers topped with local jam and cream cheese
- Sliced apples dipped in peanut butter and rolled in peanuts or granola
- Yogurt Parfaits
- Make your own veggie chips by purchasing local veggies and baking them in the oven sprinkled with olive oil and salt.
- Veggies and market hummus (Red Top Oven makes the most amazing hummus)
- Protein Bites
- Pumpkin muffins made with homemade pumpkin puree
- Pumpkin smoothies or any kind of smoothie
- Seasonal fruit drizzled with local honey
- Celery sticks filled with peanut butter and raisins
- Wheat Thin crackers covered with fruit yogurt and banana slices
- Corn chips and local salsa from the market


Watermelon-Cucumber Salad

Watermelons and cucumbers are two of my favorite things about summer, and they go perfect together! Seriously…they do. I am always looking for more ways to get fresh fruits and vegetables on my family’s dinner table and one way I do that is by salads. We pair fruit and traditional salads together quite often and my kids love it. But, the real winner for a summertime salad is my Watermelon-Cucumber Salad.
I head to the farmers market or local farm stand to pick out the perfect melon and, mint, onion and cucumbers to make this gem of a salad. I also top it with a local goat cheese from a family farm here in my region called Terrell Creek Farm from Fordland, MO. (For those of you afraid of goat cheese bc you’ve had a bad experience in the past- forget your previous experience. Terrell Creek Farm produces amazing goat cheese in a variety of flavors!)
I add a little lemon and some salted cashews to this salad for a little acidity and salt (bc salt and watermelon are a match made in Heaven.). And serve it immediately at your backyard bbq or as a weeknight side. Enjoy!
Watermelon-Cucumber Salad
Thinly sliced red onion
4 cups watermelon
1 cucumber
Mint leaves
Cashews
¼ cup olive oil
1 lemon
Salt and pepper to taste
Goat cheese
Soak 1/2 thinly sliced red onion in cold water. Pat dry 4 cups diced watermelon and 1 seeded and sliced cucumber; toss with a handful of thinly sliced mint. Drain the onion, squeeze dry and add to the salad along with some chopped cashews. Add 1/4 cup olive oil and the juice of 1/2 lemon; season with salt and toss. Top with crumbled goat cheese.
Baseball Action


Watching this little guy improve his baseball skills this spring and summer has ben a total trip! We are blessed to have great coaches (including Daddy McConnell), parents and kids on our Bronx Bombers team.
Cashew Chicken…Homemade
 I am always up for trying to replicate meals at home. Eating out not only adds up on the pocket book, but many times, isn’t worth the price. Nothing is more disappointing when we eat out and are unimpressed with our food.
One food I don’t cook often home is Oriental. It’s almost easier to eat out then trying to buy all the ingredients you need to make some specific meals…Oriental food is one of those meals for me. However, I had a basic recipe a friend gave me many years ago for cashew sauce and I have perfected a delicious Homemade Cashew Chicken recipe using this basic recipe that is simple and tasty!
The best part of this meal – it’s pretty quick and makes incredible leftovers, which means less cooking during the work week for you!
I usually fry up a little more chicken because I love using the leftover fried chicken for salads or in a tortilla roll up with lettuce, ranch dressing and cheese.
Homemade Cashew Chicken
Chicken
4 chicken breasts, thawed and cut into bite sized pieces
1 ½ cups flour
½ c milk
2 egg
Salt and pepper, to taste
Dried Parsley
½ tsp. Paprika
½ tsp. garlic powder
Oil, for frying
To the flour add salt, pepper, parsley, paprika and garlic powder. Coat chicken in the flour mixture and let sit for 10 minutes. Heat oil in a large skillet (Med High). Mix the milk and eggs together in a small bowl. Dip the pieces of chicken in the milk mixture and then back into the flour. Place chicken in one layer in the skillet and fry until browned. Remove to a plate lined with paper towels and lightly salt. Continue until all the chicken is fried.
Sauce
2 cups of water
4 chicken bouillon cubes
¼ tsp. ginger powder
2 tbsp soy sauce
1 tsp. sugar
Dash salt
2 tbsp cornstarch mixed in 1/4 c of cold water
Bring the water, bouillon, soy sauce, sugar, ginger and salt to a light boil. Add cornstarch mixture and stir constantly until thickened. Remove from heat.
To serve: Serve over a bed of rice and top the chicken with the sauce, some diced green onions or chives and cashews.


Healthy Zucchini Muffins
 Looking for ways to use up all those zucchini from your garden or maybe your neighbors? These zucchini muffins are just the trick! They also freeze well and make a quick and easy breakfast for those little ones that will starting back to school soon!
2 cups all purpose flour
1 cup brown sugar
2 tsp. baking soda
2 tsp. cinnamon
1/8 tsp. nutmeg
1/8 tsp. ginger
1/8 tsp. allspice
1/2 tsp. salt
Next stir in :
2 cups grated zucchini
1 apple peeled, cored and grated
In another bowl, beat:
3 eggs
2 tsp. vanilla
1/2 cup unsweetened apple sauce
1/2 cup oil (vegetable or canola)
1/2 cup mini chocolate chips
Stir into flour mixture until batter is just combined. Spoon into well greased muffin cups, filling to the top. (Note: If you are using muffin liners you may need to spray with cooking spray to prevent the muffins from sticking to the paper.) Bake at 350° for 20 minutes.
Garden Helpers
 I have the BEST garden helpers, wouldn’t you say? #blessedbeyondbelief
